Published: October 5, 2026 · 9 min read
Docker Network Types Explained — Bridge, Host, Overlay & More
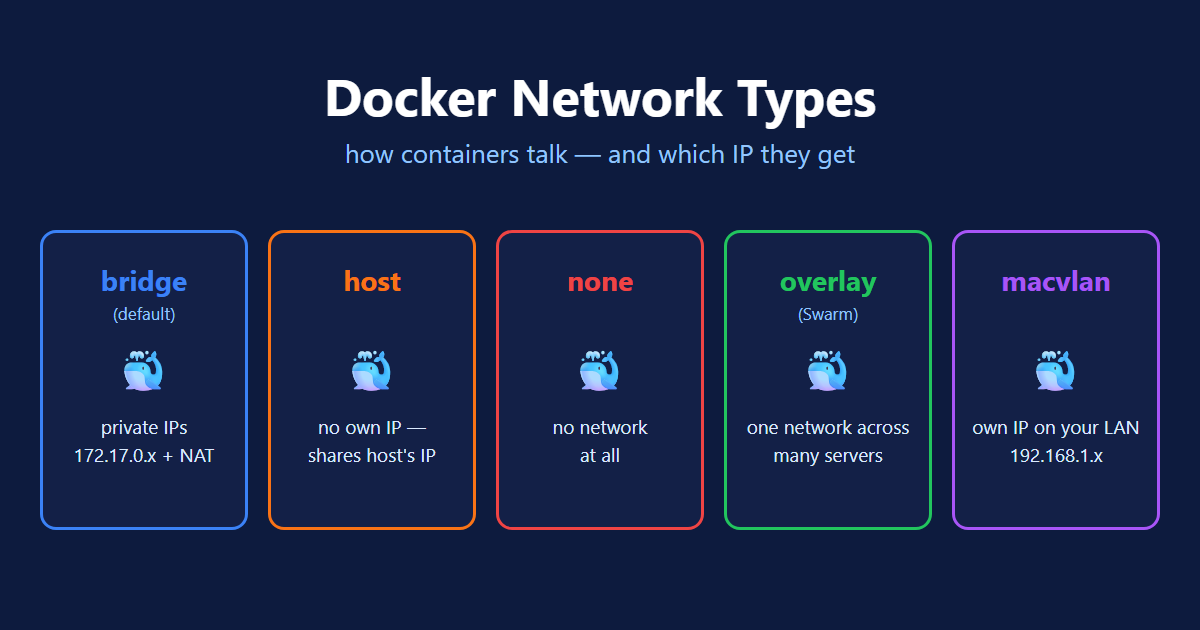
A container alone is easy. But real apps are teams — a React app talking to an API talking to a database — and the moment two containers must talk, you're in networking land. This guide gets Docker network types explained the visual way: all five of them — bridge, host, none, overlay, macvlan — each with a clear diagram showing exactly which IP every container gets, followed by every docker network command with real examples. In the last lesson one container went live on AWS; this is how multiple containers work together.
In this guide, you will:
- See all 5 Docker network types in one picture, each with its real IPs
- Understand bridge — the default — and why containers get
172.17.0.xaddresses - Learn the custom-bridge killer feature: reaching containers by name (
mongodb://db:27017) - Know when host (no own IP), none (no network), overlay (many servers), and macvlan (own LAN IP) make sense
- Master the 5 commands:
network ls,create,inspect,run --network,network rm
Why Networks Exist at All
Docker ships with three networks already created — list them first:
1. Bridge — The Default Network
Start a container without any --network flag and it lands on the bridge network: a private world inside your host machine, run by the docker0 virtual switch.
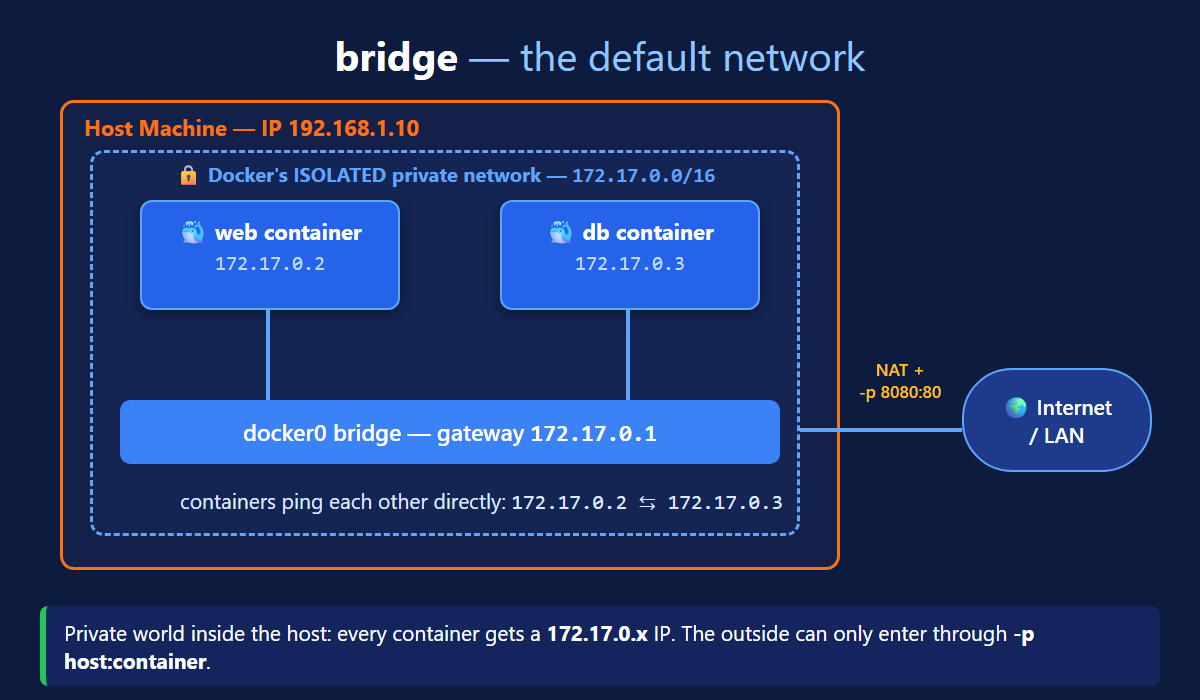
Read the IPs in the picture: the host machine has its real address (192.168.1.10), but inside it Docker builds a second, private world — gateway 172.17.0.1, first container 172.17.0.2, second 172.17.0.3. The outside can only get in through the door you know well: -p host:container.
But the default bridge has a trap — and the fix is the most useful thing on this page:
Memory hook: default bridge = a street with no house names, only plot numbers that change weekly. A custom network = the same street with name plates. That's why real projects always docker network create their own.
2. Host — No Separate Network, No Own IP
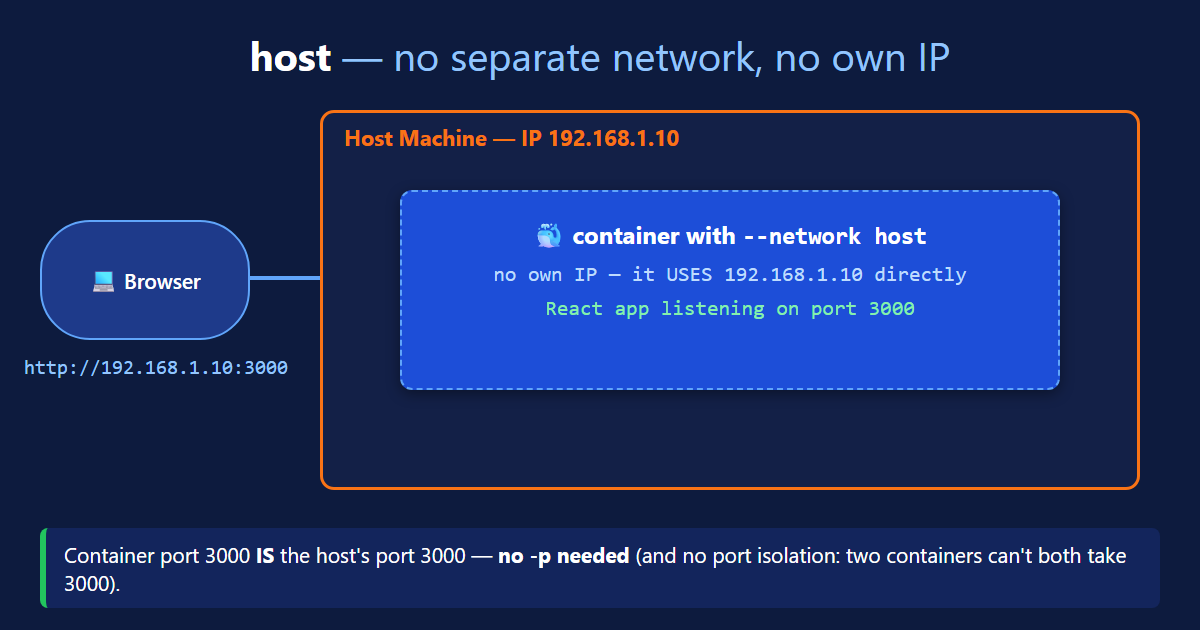
With --network host the private world disappears: the container plugs straight into the host's network stack. No 172.17.0.x IP, no NAT, no -p needed — the app's port 3000 is the host's port 3000.
3. None — Complete Isolation
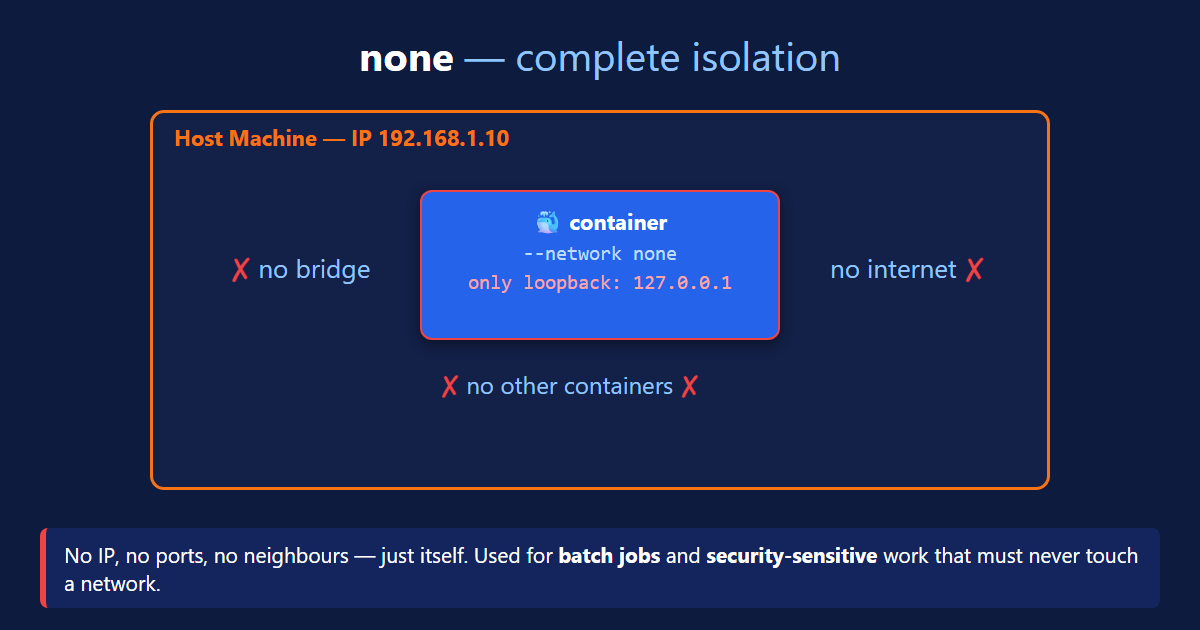
The opposite extreme: --network none gives the container nothing but its own loopback (127.0.0.1).
4. Overlay — One Network Across Many Servers
So far everything lived inside one machine. Overlay breaks that wall — it's the network type of Docker Swarm:
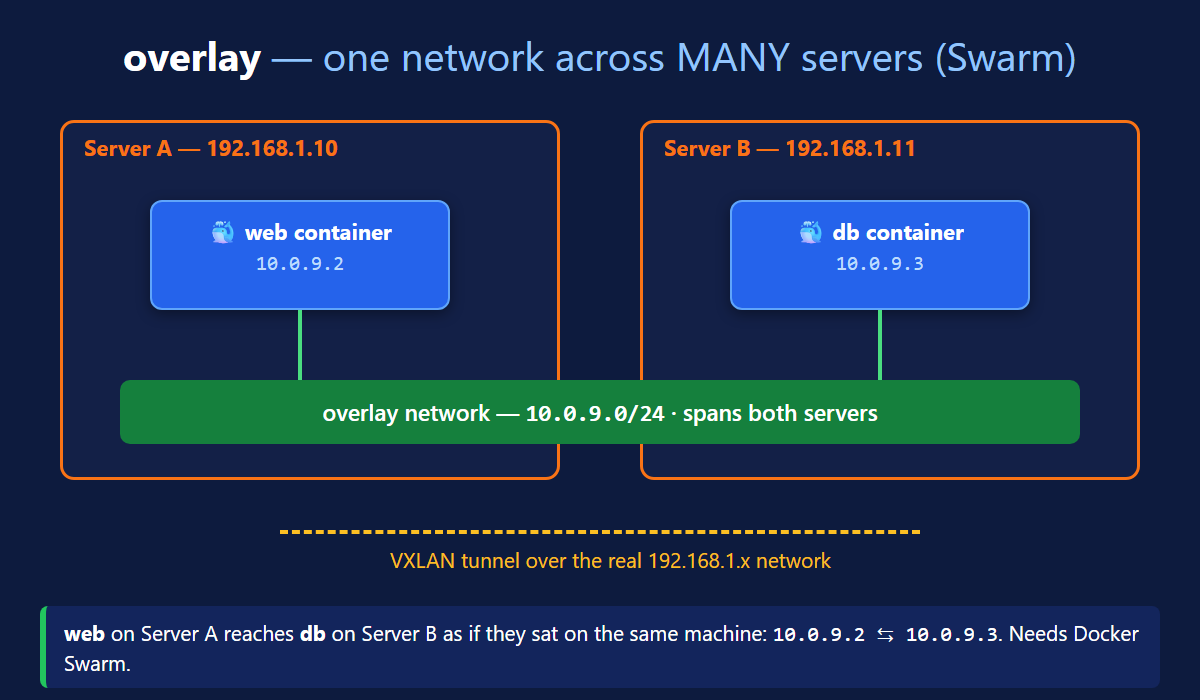
Look at the IPs: the servers live on 192.168.1.10 and 192.168.1.11, but the containers share a completely separate world — 10.0.9.2 and 10.0.9.3 on the 10.0.9.0/24 overlay — stretched across both machines through a VXLAN tunnel.
5. Macvlan — Containers Join Your Real Network
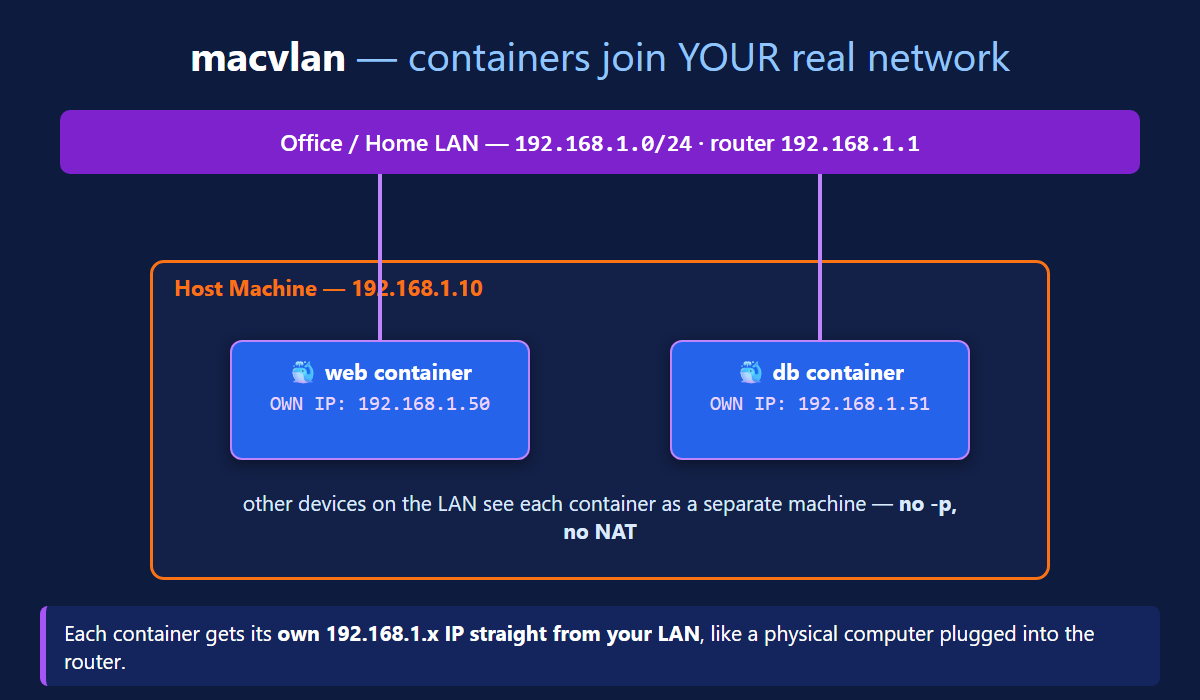
Macvlan flips the model: instead of hiding containers behind the host, each container gets its own IP on your real LAN — 192.168.1.50, 192.168.1.51 — handed out as if a new physical computer joined the network.
Which one do YOU need? For web development: a custom bridge — 95% of the time. host is a Linux-only performance tool, none is for isolation, overlay only matters with Swarm on multiple servers, and macvlan is for rare legacy/LAN cases. When in doubt: custom bridge.
The Docker Network Commands
Everything above, driven by five commands — same noun-verb grammar as always (docker network <verb>):
And the complete session, start to finish — this is the block to practice:
Docker Network Types Quick Reference
| Type | Container's IP | Reach from outside | Use when |
|---|---|---|---|
| bridge (default) | private 172.17.0.x | only via -p | quick single containers |
| custom bridge | private 172.18.0.x + names work | only via -p | real projects — 95% of cases |
| host | none — uses host's IP | app port = host port, no -p | max performance (Linux only) |
| none | none — only 127.0.0.1 | impossible | batch jobs, security isolation |
| overlay | e.g. 10.0.9.x across servers | via Swarm routing | multi-server Docker Swarm |
| macvlan | own real LAN IP 192.168.1.x | directly, like a physical PC | legacy apps needing LAN identity |
| Command | What it does |
|---|---|
docker network ls | list all networks (there is no network ps) |
docker network create my-app-net | create a network (bridge by default, -d for others) |
docker network inspect my-app-net | subnet, gateway, and every member's IP |
docker run -d -p 3000:3000 --network my-app-net my-api | start a container inside the network |
docker network rm my-app-net | delete it (disconnect containers first) |
What's Next
You can now look at any Docker setup and say exactly who can talk to whom and on which IP: the default bridge with its 172.17.0.x world behind -p, the custom bridge where names like db replace fragile IPs, host with no wall at all, none with nothing but loopback, overlay stretching one network across a whole Swarm, and macvlan handing containers real LAN addresses. The full picture lives in the official Docker networking docs (opens in a new tab), and overlay goes deeper in the Swarm documentation (opens in a new tab) — but for your projects, the habit is one line: docker network create, then --network on every docker run.
← Back to Install Docker on AWS EC2
Continue to Docker Multi-Stage Builds →
Frequently Asked Questions
What are the 5 Docker network types?
Docker has five network types (drivers): bridge — the default, a private network inside one host where containers get 172.17.0.x IPs and the outside enters through -p; host — the container shares the host machine's network and IP directly, no own IP and no -p; none — complete isolation, only loopback 127.0.0.1, no network at all; overlay — one network spanning multiple servers in Docker Swarm, so containers on different machines talk as neighbours; and macvlan — each container gets its own real IP on your physical LAN (like 192.168.1.50) and looks like a separate physical machine. For everyday web development you use bridge networks 95% of the time.
What is the default Docker network?
The default is the bridge network named bridge, built on the docker0 interface with gateway 172.17.0.1. Every container started without a --network flag lands on it and receives the next free IP: the first container gets 172.17.0.2, the second 172.17.0.3, and so on. Containers on it can reach each other only by those IPs — name resolution does not work on the default bridge, which is the main reason real projects create a custom bridge network instead.
What is the difference between bridge and host networks in Docker?
On a bridge network the container lives in a private world with its own IP (for example 172.17.0.2), and the outside reaches it only through port mapping: -p 8080:80. On the host network there is no private world at all — the container uses the host machine's network stack and IP directly, so an app listening on port 3000 is immediately available at the host's IP on port 3000, with no -p flag. Bridge gives isolation and lets many containers use the same internal port; host gives raw speed but no isolation, only one container per port, and it only works on Linux.
Why should I create a custom bridge network instead of using the default?
One killer feature: names. On the default bridge, containers reach each other only by IP (mongodb://172.17.0.3:27017) — and container IPs change on every restart, so hard-coded IPs break. On a custom bridge network (docker network create my-app-net), Docker runs a small internal DNS: the api container reaches the database as mongodb://db:27017, by container name, and Docker resolves the name to whatever IP the db container has right now. Custom networks also isolate projects from each other — containers on my-app-net cannot see containers on another network.
When should I use the overlay network in Docker?
Use overlay when your containers run on more than one machine and must still talk to each other — that is Docker Swarm territory. After docker swarm init, docker network create -d overlay my-swarm-net builds one network that spans every server in the swarm: a web container on Server A (10.0.9.2) reaches a db container on Server B (10.0.9.3) by name, as if they sat on the same machine. Docker tunnels the traffic between servers using VXLAN over the real network. On a single machine you never need overlay — a custom bridge does everything.
What is macvlan in Docker and when do I need it?
macvlan gives a container its own real IP address on your physical LAN — for example 192.168.1.50 straight from your office network — so your router, printers, and other computers see it as a separate physical machine, with no -p and no NAT. You create it with docker network create -d macvlan passing your LAN's subnet, gateway, and the parent interface (like eth0). It exists for legacy applications and network appliances that need their own LAN identity; in everyday web development it is rare — bridge networks cover almost everything.
How do I create and delete a Docker network?
Create with docker network create my-app-net (bridge is the default driver; add -d overlay or -d macvlan for other types), verify with docker network ls, and attach containers at start with docker run --network my-app-net. Inspect members and their IPs with docker network inspect my-app-net. Delete with docker network rm my-app-net — it fails with "network has active endpoints" while containers are still connected, so stop and remove those containers first. Note the listing command is docker network ls — there is no docker network ps.