Published: October 5, 2026 · 10 min read
Install Docker on AWS EC2 and Deploy a React App Live
Everything so far happened on your own laptop. Today the training wheels come off: this guide shows how to install Docker on AWS EC2 — a real Ubuntu server in the cloud — run the React app image we pushed to Docker Hub in the last lesson, open the right port in the AWS security group, and watch the app load from a public IP on any device in the world. This is the exact session from class, screenshots included — the same 8 install commands, the same docker run -d -p 2000:4173, the same live URL.
In this guide, you will:
- Launch an Ubuntu EC2 instance on AWS
- Install Docker with 8 commands — and understand what each one does
- Learn the two classic pairs:
updatevsupgradeandstartvsenable - Fix the famous "permission denied" error with
usermod -aG docker+newgrp - Run the React app with
docker run -d -p host:container - Open the security group inbound rule — the AWS door everyone forgets
- Visit
http://public-ip:portand see your container live on the internet
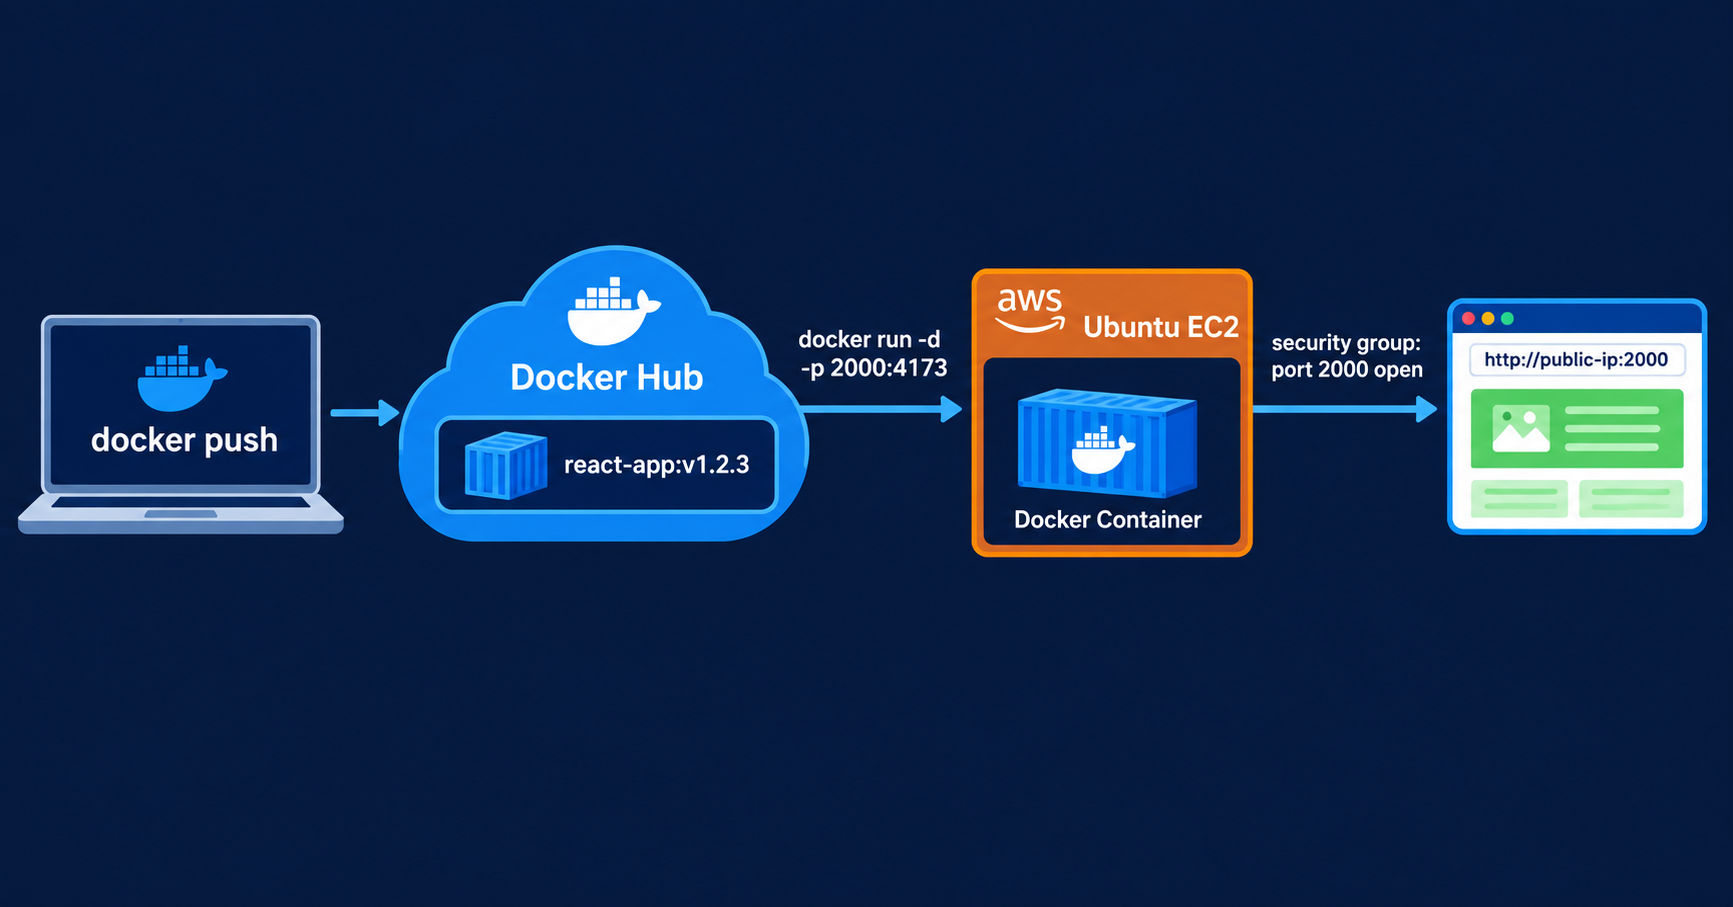
The Big Picture — Your Image Travels to the Cloud
Remember the promise from Why Docker Exists: the image travels, and it works the same everywhere. Today we prove it. The image you built and pushed from your laptop will run, unchanged, on a server you've never configured:
Step 1 — Launch an Ubuntu EC2 Instance
In the AWS EC2 console (opens in a new tab), launch a new instance the way we did in class:
- AMI: Ubuntu Server (the latest LTS)
- Instance type:
t2.micro— free-tier eligible, plenty for one container - Key pair: create/select one so you can connect to the terminal
- Network settings: leave the defaults for now — we'll edit the security group in Step 4, after the container is running, so you see exactly which door it opens
Once it's running, connect to its terminal (EC2 Instance Connect in the browser, or SSH with your key pair). You'll land on a prompt like ubuntu@ip-172-31-8-49:~$ — a completely empty Ubuntu machine. No Node, no Docker, nothing. Perfect.
Install Docker on AWS EC2 — The 8 Ubuntu Commands
A fresh server needs housekeeping before installing anything. The first pair of commands is the classic interview duo:
Now install Docker itself — note the package name:
Docker Engine is a background service, and services have their own on/off pair — one for now, one for every reboot:
Next, the fix for the error every beginner hits — running docker as a normal user fails until your user joins the docker group:
And verify the whole installation with one command:
Here's the complete block to keep — all 8 commands in order, ready to paste into any fresh Ubuntu server:
Memory hook: the 8 commands are 4 mini-stories — refresh & upgrade (update, upgrade), install (docker.io), turn on now & forever (start, enable), fix my permissions (usermod, newgrp) — sealed with a --version check.
Step 3 — Run the React App with Port Mapping
Docker is installed on the cloud server, and our React app image is sitting on Docker Hub from the last lesson. One command connects them — this is the exact command from class:
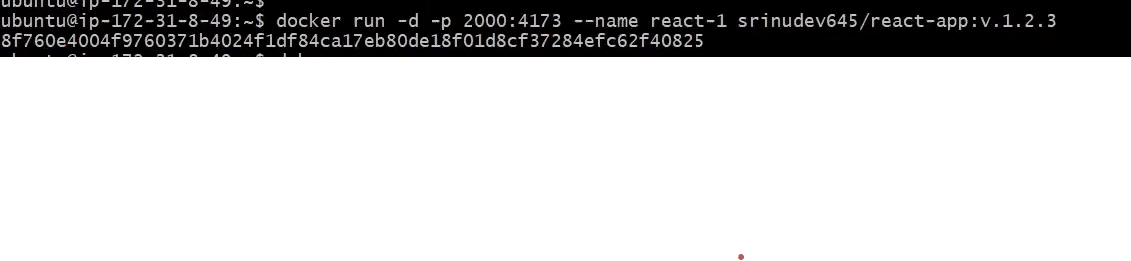
Two flags are new since the commands cheat sheet, and both matter on a server: -d (Detached) keeps the container running in the background — without it, closing your SSH session would take the app down with it. --name react-1 means you can type docker stop react-1 later instead of hunting for a container ID.
Confirm it's alive and read the PORTS column carefully:

Step 4 — Open the Port in the AWS Security Group
Here's the step everyone forgets — and the #1 reason "it works in docker ps but the browser can't reach it." Your request has to pass through two doors:
- Docker's door — opened by
-p 2000:4173✓ (done) - AWS's door — the security group, which blocks every incoming port by default ✗
The inbound rule's port must be the host port — the left side of -p 2000:4173. Opening 4173 does nothing: that port only exists inside the container. And Source 0.0.0.0/0 means "the whole internet" — fine for a class demo, but on a real project you'd restrict who can reach which ports.
Step 5 — Visit Your App on the Public IP
Grab the Public IPv4 address from the EC2 console and put it together with the host port:

That's the whole promise of Docker in one screenshot: an app built on one laptop, pushed to Docker Hub (opens in a new tab), pulled onto a cloud server, and served to the world — without installing Node.js on the server even once.
App Not Loading? Walk the Path
When the browser spins forever, don't guess — walk the request's path from the outside in:
Quick Reference Table
| Step | Command / Action |
|---|---|
| Refresh package list | sudo apt update |
| Upgrade installed packages | sudo apt upgrade -y |
| Install Docker | sudo apt install docker.io -y |
| Start Docker now | sudo systemctl start docker |
| Start Docker on every boot | sudo systemctl enable docker |
| Run docker without sudo | sudo usermod -aG docker $USER |
| Apply group change now | newgrp docker |
| Verify installation | docker --version |
| Run the app | docker run -d -p 2000:4173 --name react-1 image |
| Check it's running | docker ps |
| Open the AWS door | Security group → inbound rule → Custom TCP, port 2000 |
| See it live | http://<public-ip>:2000 |
What's Next
You just did the thing most tutorials only talk about: took a real cloud server from empty Ubuntu to a live, publicly reachable React app — installed Docker with 8 commands you can now explain one by one (update vs upgrade, start vs enable, the usermod + newgrp permission fix), ran the image from Docker Hub with -d and -p, and opened both doors (Docker's -p and AWS's inbound rule). Every command from the cheat sheet works exactly the same up there as on your laptop — that's the point of Docker.
← Back to Docker Commands Cheat Sheet
Continue to Docker Network Types →
Frequently Asked Questions
How do I install Docker on an AWS EC2 Ubuntu instance?
Eight commands on a fresh Ubuntu EC2 instance: sudo apt update (refresh the package list), sudo apt upgrade -y (upgrade installed packages), sudo apt install docker.io -y (install Docker — the package is named docker.io on Ubuntu), sudo systemctl start docker (start the service now), sudo systemctl enable docker (auto-start it on every boot), sudo usermod -aG docker $USER (let your user run docker without sudo), newgrp docker (apply the group change without logging out), and docker --version to verify. A version number with no sudo means the installation is complete.
What is the difference between sudo apt update and sudo apt upgrade?
apt update refreshes the package list — it downloads the latest catalog of available packages but installs nothing. apt upgrade takes the packages already installed on the machine and upgrades them to the newest versions from that catalog (the -y flag auto-answers yes to prompts). The memory hook: update re-reads the menu, upgrade orders the new dishes. They always run in that order, because upgrading against a stale catalog installs outdated versions.
What is the difference between systemctl start docker and systemctl enable docker?
systemctl start docker turns the Docker service on now, for the current session only — if the server reboots, Docker stays off. systemctl enable docker registers Docker to start automatically on every boot. On a real server you always run both: start for today, enable for every reboot after. This matters on AWS because EC2 instances get stopped and started — without enable, your containers' engine simply isn't running after a restart.
Why does Docker say permission denied, and how do usermod and newgrp fix it?
By default only root and members of the docker group may talk to the Docker Engine, so a plain user running docker ps gets "permission denied while trying to connect to the Docker daemon socket". sudo usermod -aG docker $USER appends (-a) your user to the docker group (-G) — the -a is critical, because without it you'd replace your user's groups instead of adding one. Group changes normally apply at next login; newgrp docker applies the new membership immediately so you can keep working in the same terminal.
What does docker run -d -p 2000:4173 mean?
docker run -d -p 2000:4173 --name react-1 srinudev645/react-app:v.1.2.3 starts a container from the React app image. -d is Detached: the container runs in the background and gives the terminal back, which is essential on a server. -p 2000:4173 maps host port 2000 to container port 4173 — the React preview server listens on 4173 inside the container, while the EC2 machine exposes it on 2000. --name react-1 gives the container a human name. If the image isn't on the server yet, Docker pulls it from Docker Hub automatically before starting.
Why can't I access my Docker container on the EC2 public IP?
Walk the request's path with three checks. First, is the container alive? docker ps must list it — if not, it stopped (check docker ps -a). Second, is the port mapping right? The PORTS column must show 0.0.0.0:2000->4173/tcp — if not, re-run with the correct -p host:container order. Third — the most-forgotten step — is the AWS security group inbound rule added for the host port? Finally check the URL itself: http (not https), the public IP (not the private 172.31.x.x address), and the host port from -p.
What is an AWS security group inbound rule and why does Docker need it?
A security group is AWS's firewall around your EC2 instance, and by default it blocks every incoming port except the ones you explicitly allow with inbound rules. Docker's -p flag only opens Docker's own door — it connects the host port to the container port — but traffic from the internet still has to get through AWS's door first. In the EC2 console: Instances → Security tab → the Security Group → Edit inbound rules → Add rule with Type Custom TCP, the host port (2000 in our class), and Source 0.0.0.0/0 for a public demo. Traffic must pass through both doors to reach your app.